 Design eye-catching, easy maintenance container gardens like a pro with these simple tips and tricks.
This post contains affiliate links for your shopping convenience.
Here’s the million dollar question I’ve been asked for years:
“Can you tell me what to plant for a no maintenance garden?”
Depending on my mood I may answer “gravel and silk flowers”. But believe me; I understand the real need for a no maintenance garden. We all get into busy seasons of life where even if we love our garden, we just don’t have much time to devote to it. I’m smack dab in the middle of one right now trying to garden with two young kids in tow.
The reality is any living plant is going to need some maintenance from time to time. The trick is knowing which plants need the least maintenance and then putting them in the right environment so that they thrive. Some would say the better description is “easy maintenance” rather than “low” or “no maintenance.”
I don’t know about you, but just the term “easy maintenance” sounds much more appealing to me than “low maintenance.”
The phrase “easy maintenance” sounds like something I could accomplish in the random 15-minute intervals my life runs in these days.
“Low maintenance” could mean only once or twice a year, and it could involve higher amounts of equipment and time, which turns the endeavor into a Project with a capital P. I’d prefer more “easy maintenance” plants in my life, thank you very much.
Container gardening is one of those gardening activities that seems, at least at first glance, like it should be “easy maintenance.” How hard can keeping plants alive in a pot be?
Unfortunately, it can be harder than you might think. And sometimes we unknowingly make choices that stack the deck against our success.
This post is mainly geared toward ornamental plants. For more information on growing vegetables in containers, I’ve written a couple of posts here and here.
If you want to create “easy maintenance” containers this year, you need to consider these factors: the containers, the potting mix, the plants, and the location.
The Containers
- Any container used for plants must have holes for drainage. Seems super-basic, but many container plant issues I’ve seen over the years have been due to lack of drainage holes.
- Unglazed clay pots dry out much quicker than glazed ceramic or plastic pots. Metal pots may heat up in the sun.
- Potting mix in a large container dries out slower than a small container. Smaller containers need more watering during the heat of summer, maybe even multiple times per day depending on the container and its location.
- Self-watering pots have reservoirs in them that will allow you to go longer between waterings. They can be expensive but the ones I’ve tried work really well and I have no doubt they’ve saved some plant lives along the way.
- Don’t worry about completely filling large containers with potting mix. Most annuals’ roots only occupy the top six to eight inches of soil anyway. You probably have something at home right now that can be used as a space filler in the bottom of your large pots– empty plastic water or pop bottles, aluminum cans, or upside down plastic pots are all good choices.
- There is absolutely no need to put a layer of rocks or gravel at the bottom of the container. Despite what my mom (and probably yours) told you, it doesn’t improve drainage. All it does is reduce the volume of soil in the pot. Covering the drainage holes with something to keep the soil from washing out is all that’s necessary– use a stone, a piece of broken pot, or even newspaper, burlap or a coffee filter for this.
- How many containers you can realistically care for? Even “easy maintenance” plants can become hard to care for if you have too many. It was hard for me to admit this to myself with my own garden. After I scaled back my numbers of containers dramatically, what I did grow looked better than ever. And I could sit back and enjoy them, not just hurry along to tend to the next one in line.
The Potting Mix
- Use a good quality potting mix (a.k.a. soilless mix) for your containers. These mixes are formulated to drain well and are lightweight. Many also come with time-release fertilizer already incorporated. Stay away from inexpensive “potting soil”; in my experience, these mixes tend to drain poorly. Poor drainage can kill your plants.

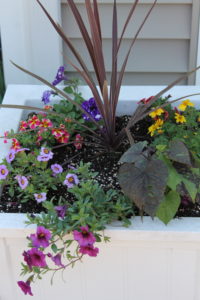
Large self-watering container near my garage– starting at the 6 o’clock position and moving clockwise we have Calibrachoa ‘Superbells Plum’, ‘Superbells Evening Star’, ‘Superbells Holy Moly!’, Petunia ‘Night Sky’, ‘Superbells Coralberry Punch’ (somewhat hidden), Bidens ‘Yellow Charm’, Sweet Potato ‘Kelly Ray’, and Cordyline ‘Red Sensation’ in the center.
- In a perfect gardening world, we’d all replace 100% of the potting mix for our containers each year. That’s not practical in terms of cost– and it’s certainly not “easy maintenance” to wrestle with dumping out a giant container of potting mix each year. You can reuse potting mix, but realize there is some risk. Truth be told, I’ve ruined entire plantings when they contracted diseases and died from reused potting mix. My compromise is this: I remove the top few inches of potting mix in my larger containers before adding more potting mix. The old potting mix ends up either in my compost bin or my vegetable garden. So far I’ve never transferred any disease problems into my garden this way; in theory at least, you could carry disease into the garden by reusing it there. Use your best judgement; if a particular container was a hot mess of disease last year, remove that old soil, sanitize the pot, and put the old potting mix away from any plants you care about.
- Some potting mixes contain water absorbing polymers that absorb water and slowly release it, allowing for longer time intervals between watering, which is a HUGE factor in creating an easy maintenance container. You can purchase the polymer by itself and add it to your favorite potting mix. Just be sure to follow the directions; this is not a case of “a little is good, more must be better.” If you add too much to your containers, the potting mix will stay too wet for too long, which can harm plants just as much as being too dry. ** Garden Hack** Water absorbing crystals are also used in disposable diapers (how did you think they could hold so much?!?!) We have put diapers in the bottom of some of our containers that are hard to keep watered because they are in full sun literally all day long. Diapers have saved these plants lives. Literally.
Plants
Care & Maintenance
- Make sure all the plants for a given container like the same conditions (i.e. sunny, shady, part-sun, etc.). Otherwise, there will always be an unhappy plant no matter where you place the container.
- Succulents are incredibly forgiving for intensely sunny areas or if you forget to water regularly. These durable plants can make even the brownest thumb appear a shade of green. They are the perfect easy maintenance plants to fill containers in those “surface of the sun” sunny areas in your landscape.
- Some plants need regular deadheading (removal of dead flowers) to keep flowering; others don’t. Petunias are a great example of an annual that needs regular deadheading. Calibrachoa, also called million bells, looks a lot like a tiny petunia, but with one key difference– you don’t need to deadhead them! They also love hot sunny spots so you will find a lot of them at my house.
- Consider growing plants with attractive foliage and you don’t need to worry about flowers at all. Coleus, Rex begonia, succulents and ornamental sweet potatoes are all good examples of plants grown purely for foliage.
Color, Texture & Other Design Elements
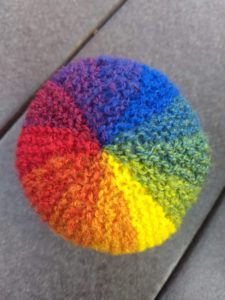
- Color is a natural starting point for container design. Go back to the color wheel that most of us encountered in art class at some point. There are three basic no-fail ways to pick color like a professional:

Knitted ball color wheel made with handspun & dyed yarn
- Choose shades of the same color
- Use colors that are opposite each other on the color wheel (red/green, orange/blue, yellow/violet)
- Pick colors next to each other on the color wheel (red/orange/yellow)
- Odd numbers of plants will always be more pleasing to the eye than even numbers (whether you plant in containers or the ground). While taking pictures for this post I noticed that all my containers ended up with even numbers of plants– why can’t I follow my own advice?!?! I blame shopping with young kids that put some extra plants in my cart when I wasn’t looking. With nowhere else to put them, I tucked the extras into the pots and broke all the “rules”. The garden police may not like it but oh well.
- This phrase is overused in garden writing, but I think it’s still a good rule of thumb. When choosing plants for a container, you need a thriller (something tall), a filler (something medium-sized and bushy), and a spiller (something cascading or trailing).
- Choosing a variety of flower and foliage shapes and sizes adds the extra visual interest that takes your container from good to great.

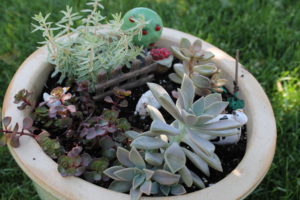
My son’s succulent fairy garden; clockwise from bottom right– Graptopetalum s. paraguayense, Sedum ‘Dragon’s Blood’, Sedum ‘Sea Urchin’, and Graptosedum ‘California Sunset’.
- Still stuck? Check out Proven Winners’ container recipes site for inspiration. I’ve been known to print out the recipe and take it with me shopping for plants. Even if I can’t find the exact plants they used, the recipes are a great source of inspiration.
Location is Key
- Make sure you place plants in their preferred environment (i.e. place plants that prefer full sun in a sunny location). A plant in less than ideal conditions will not perform as well. It might even die.
- Don’t be afraid to move pots around as the season progresses. If you need a pop of color in a drab section of the garden midsummer, move one of your containers in for a temporary stay.
- Put containers where you can look at and enjoy them. What good is a container of flowers you rarely see? Plus, if you don’t see the containers regularly, it’s highly likely you’ll forget about them and have a bunch of dead plants on your hands by the time the first summer heat wave hits-I speak from experience on this!
- Remember there is nothing “easy maintenance” about a container that requires dragging a hose or watering can out across half your yard! Put containers where you can water them at a moment’s notice.
Essential Supplies
** Supplies in green are affiliate links for your shopping convenience.
Caring for container gardens at my house became drastically easier when I started using:
Water absorbing polymers. You can buy potting mix with these crystals already mixed in, but I like mixing them in myself.
-and-
Self-watering containers. You can even buy an adapter to make any pot self-watering! My all-time favorite is this particular planter we have in front of our garage. They are pricey, but we have had ours for 10+ years and they look just as good as the day we first set them out.
Hopefully, you can use this post to help you make a few tweaks to your container gardens this season so they’re more “easy maintenance” than they used to be.
If you liked this post, please subscribe to Grounded and Growing today and receive your copy of “15 Tips to Become a '15 Minute Gardener'” so you can spend less time working ON your garden and more time enjoying being IN your garden.! It’s absolutely free. When you join the Grounded and Growing community, you’ll finally take the garden off your “To-Do” list and allow yourself time to enjoy your garden and savor the peace and serenity there. I tell subscribers about new posts as soon as I hit ‘publish’ and send weekly-ish updates on what’s going on in my garden– good, bad AND ugly.

All Rights Reserved. © 2019 Jennifer Schultz Nelson.
Thanks !!
This was a very informative article. There’s a lot of of very good information that I’m hoping will help me, one who does not have a very green thumb, grow an attractive garden. Thanks!
Thank you Linda! I’m so glad you found the article helpful!
Super article! I liked the idea of moving pots around when yo need extra color somewhere; maybe in-between perennials not yet in bloom. I will be trying that.
Thanks Beth!
Great, great, great article!!!!! I just posted all my containers and am so proud of myself for doing a good job! I may have used the “if a little is good, then a lot is great” method with the fertilizer I used 😂😂😂! I pray not! Thanks for a great read!