The holy grail of a good tasting tomato in the dead of winter is possible WITHOUT a greenhouse thanks to the Aerogarden.
This post contains affiliate links for your convenience. I only promote products I love.
Post newly updated February 7, 2021
Name a homegrown vegetable that you would love to get your hands on in the dead of winter. I bet many of you immediately thought of a tomato. I know that’s tops on my list.
Years ago when I was a fairly new Extension educator, I had an opportunity to try a new product on the market called an Aerogarden. It promised homegrown herbs and vegetables, even tomatoes, INDOORS. I had my doubts, but I was intrigued.
There were only a handful of models available back then, but all of them were basically big bowls with a small aquarium pump that circulated water over small seed pods that held seeds embedded in a spongy material. A timer and fluorescent lights on a timer completed the system.
Aerogardens for All!
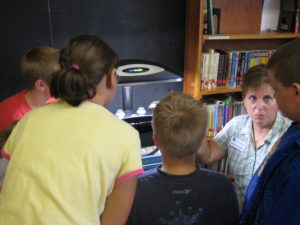
Here I am, circa 2008, helping some 5th graders plant their first Aerogarden in their classroom.
The first plants I grew in the Aerogarden were an assortment of herbs– and the results were impressive. As a certified plant addict (according to my husband) this opened up a whole new level of addiction. I could grow plants anywhere, anytime.
I introduced various community groups to the Aerogarden, and it was really popular with teachers. The Aerogarden was a reasonably sized self-contained unit that grew really healthy plants without a crazy amount of time or money. It offered a huge step up from the typical plants grown on windowsills in the classroom.
My First Aerogarden Tomatoes Were Spectacular Failures
With a little success under my belt from my first Aerogarden herb crop, I tried other seed kits. We grew flowers, lettuce, other herbs– then I read an advertisement that you could grow “any” tomato in an Aerogarden. My immediate instinct was to put the promise of “any” tomato to the test.
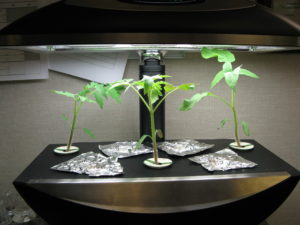
The only pictures I have of my first attempt at growing tomatoes in an Aerogarden. It was a giant disaster!
So I attempted to grow a slicer, beefsteak and a cherry tomato plant in the Aerogarden. It was a disaster. They grew like mad, but never produced a single flower or fruit. I noticed that those first advertisements about growing “any” tomato disappeared from the Aerogarden instructions. Instead they started mentioning specially developed tomato cultivars for the Aerogarden. Honestly, that made a lot more sense to me than trying to grow a standard-size tomato.
Some of my colleagues jumped on the Aerogarden bandwagon and had great success with their tomatoes– so I saw for myself what was possible.
I didn’t try to grow tomatoes myself until this year. And I didn’t have my own Aerogarden until last year! The original models with fluorescent lights that needed regular replacement got expensive in a hurry. I didn’t get an Aerogarden of my own until the LED light option was affordable. The LED option promises years of maintenance-free growing since there are no light bulbs to replace.
My Aerogarden Setup:
** Items listed in green are affiliate links for your shopping convenience.
Seeds: Tomato Seed Pod Kit for 9-Pod Aerogardens (Red Heirloom & Yellow Heirloom) The Amazon links I’ve included will ship quicker, but the Aerogarden site offers a custom kit where you can mix the red/yellow tomato seed pods plus hot peppers too) If you buy the custom kit I recommend buying a set of plant spacers (they are included with the Red Heirloom kit linked to on Amazon)
Fertilizer: Provided with seed kit
Other Accessories: “Artificial Bee”: Children’s electric toothbrush to vibrate open flowers and distribute pollen
Water: Filtered tap water– even so you will get a crusty buildup from the salts in the fertilizer around the edges of the pods and the rim of the basin. Some people do a total water change every other time they add nutrients (which ends up being about once per month).
Water Changes?
I never bothered with changing the water before I grew tomatoes– I had no issues with other kinds of plants in the Aerogarden. But tomatoes are one of the longest-producing crops for the Aerogarden. Reportedly the tomatoes can keep on producing for up to year after the first harvest. I noticed a few days ago that the new growth on my tomatoes was pretty yellow. That could potentially indicate an available nutrient issue. The nutrients that you must add to the water exist in water-soluble salt form, and these salts accumulate in the basin, and can affect how the plant takes up nutrients. They don’t wash away as they would in a garden bed.
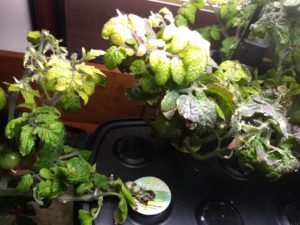
The new growth on my tomatoes was looking yellow, so I thought trying a total water change to flush out any salt buildup was worth a try.
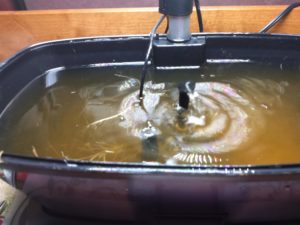
Don’t let the brown water color scare you. The nutrient solution that you add to Aerogardens gives the water a brown tinge.
So today, on day 119 after planting I attempted my first ever water change. Honestly, it was easier than I thought. The lid of the basin, which holds the seed pods/plants, can be removed. I carefully raised this portion and had to cut a small section of roots to free it from the pump power cord. I used a plastic dishpan to rest the lid on while I cleaned the basin. The amount of roots you’ll find will be impressive! You will have to unplug at least the pump to remove the basin. I unplugged the whole unit.
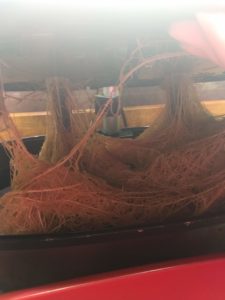
There is a solid mat of roots under my mature tomato plants!
I dumped all the water in the basin down my kitchen sink and cleaned it with a dishcloth and warm water, but no soap. I also cleaned as many roots as I could from around the pump assembly. When the tomatoes are done, I’ll do a more thorough job with soap and vinegar to clean any mineral deposits, and I’ll also remove the pump and pick out any bits of roots there. My goal was to keep the water change as simple as possible!
I refilled the water, added nutrients and reassembled the Aerogarden. When I plugged it back in, the control panel gave me the option to treat the unplugging as a power outage or as starting a new garden. I chose the power outage option, so all my settings, even the days since planting, were still there after restarting. The only thing I needed to adjust was the clock.
So How Long Did it Take to Get a Ripe Tomato?

Merry Christmas! We harvested our first Aerogarden tomatoes on December 20, 2018. And yes we ate them first thing in the morning in our PJ’s. With salt.
Ahhh the eternal million dollar question. I planted my Aerogarden tomato crop on October 10, 2018 and harvested the first tomatoes on December 20, 2018– so 71 days. Not too terribly far off from what I see in my own garden in the summer months. Usually I can plant tomatoes outdoors in mid-May and if I’m lucky, the first tomatoes are ripe by mid- to late-July.
Tips for Growing Aerogarden Tomatoes:
- Use varieties offered by Aerogarden, at least at first. Although you can plant any seed in the Aerogarden if you use empty seed pods, I recommend starting with their varieties to get some success under your belt. From there, if you want to try your own variety choices, choose cultivars that are bred for containers/small spaces. Cultivars like: Tumbling Tom, Little Bing, Patio Princess
- Remember that tomato plants are fairly large so you don’t plant each pod for a given Aerogarden. A six-pod Aerogarden can only support two tomato plants, a seven-pod Aerogarden supports three plants, and a nine-pod Aerogarden supports four plants.
- Put the Aerogarden where you CAN’T forget about it. As awesome and automatic much of Aerogarden growing is, you still need to check on it and add water, nutrients, and harvest the tomatoes! Plus I think half the fun is checking the progress on your crop.
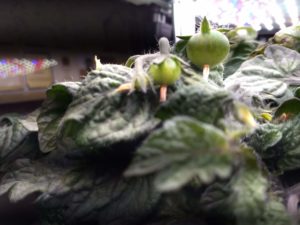
Our first baby tomatoes!
- Remember tomatoes take awhile to grow and product fruit– be patient! One of the questions I see popping up online related to Aerogarden tomatoes is “Why don’t I have tomatoes yet?!” A good portion of the time I think people are just impatient. Tomatoes take time. My first green tomatoes didn’t appear until 45 DAYS after planting! Assuming your house isn’t too cold or too hot, and you haven’t over-fertilized your plants, you probably just need some patience.
- You must pollinate the flowers! Pollination is the process where pollen from the tomato flower contacts the pistil, another structure in the tomato flower. When a flower is pollinated, new tomato seeds begin to grow, surrounded by a fruit (the yummy tomato we want to eat!) Outdoors in our gardens, the wind typically does an excellent job of pollinating tomato flowers. Occasionally an insect may help, but they are mainly wind-pollinated. Since it’s not typically windy indoors, and we hopefully don’t have a bunch of bugs flying around, we need to help our tomatoes set fruit. The Aerogarden company will sell you an artificial “bee” that vibrates, but I used one of my son’s electric toothbrushes. You just turn it on and hold it gently at the stem end of newly open flowers. Usually you’ll see a tiny puff of yellow powder– that’s the pollen. A green tomato should begin to grow where the flower used to be a few days after pollinating.

Our version of an artificial bee– a children’s electric toothbrush
- Don’t be afraid to prune the plants. This advice has been hard for me to follow. I did the initial recommended pruning, which says to remove the growth just above the fifth leaf on each plant. After that I just let them grow. The directions said to prune any branches growing out away from the lights. But they were all behaving well, staying more or less under the lights. You will need to remove dead leaves here and there– this is completely normal. Recently, I noticed some of my plants were looking pretty straggly. I removed all the dead/dying leaves. I pruned any bare stems back to where a leaf was or had been. Three days later, there are tiny new sprouts on many of the pruned stems.
How long will tomato plants produce in the Aerogarden?
According to the instructions, tomatoes are said to last for anywhere from six months to a year in the Aerogarden. I started out in October 2018 with two yellow-fruited and two red-fruited heirloom plants grown from pods purchased from Aerogarden.
Keep in mind that my plants were not producing ripe fruits this whole time. It was more like waves of flowering/fruiting/ripening/recovery. But when the fruits were ripening we had enough for at least one snack or salad most days of the week.
One of the yellow-fruited plants had problems from the beginning– it appeared stunted and somewhat deformed. But eventually produced some ripe fruits– and promptly died. The other yellow-fruited plant was vigorous and grew well for several months longer– but then it also died, for reasons that I couldn’t identify.
One-year-old Aerogarden tomato plants = Dead plants?
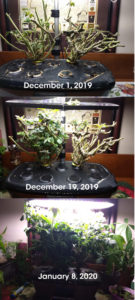
It took a few weeks, but my near-dead Aerogarden tomato plants sprang back to life with a hard pruning!
The two remaining red-fruited plants were one-year-old in October 2019, and were covered in ripening fruits. By the end of November 2019, a lot of the leaves were dying all at once. I wondered if the plants were just done. But the tips of each branch were growing.
On December 1, 2019, I removed all the dead leaves and trimmed the overgrown branches back to what looked to be a viable bud. I also cleaned the bowl thoroughly and even took the pump apart to clean out bits of roots that had grown in and around it. Very carefully, I removed approximately half of the roots extending from the plants.
They were brown, squishy, and came out without any effort at all– sure signs they were dead roots. I could have removed more than I did but I was being cautious so as to preserve any living roots that might still be there.
The plants (at least what was left of them) looked pretty pathetic when I was done. Within a week there were tiny buds springing to life along each cropped branch. But many of them died. I worried there were not any viable roots left– the fact that the plants were not using much water seemed to suggest I was correct.
Around 3-4 weeks after the drastic pruning, the plants started using a lot more water. I was refilling the bowl every 3-4 days, which is more typical for mature, actively growing tomatoes in the Aerogarden. I took a peek inside and saw a web of new healthy white roots. Victory!!
Hard pruning appears to be the “Fountain of Youth” for Aerogarden tomatoes!
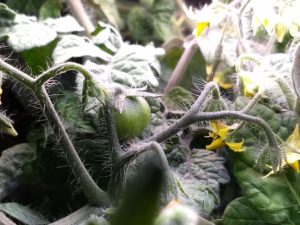
Then the plants took off growing like crazy. One plant was growing a lot faster than the other at first, but 5 weeks after that initial drastic pruning, you can’t tell the difference between the two. They’re also covered in flowers again and I spotted my first baby tomato after I pruned so heavily in December.
At this point I think I could probably keep the plants going almost indefinitely, as long as I’m willing to cut them back periodically. We’ll see how long I can keep these plants going…..
R.I. P. Aerogarden Tomatoes, October 10, 2018– January 20, 2021

My aerogarden tomatoes are officially dead. As a doornail. But I don’t see this as a failure in the least. On the contrary, considering they had been growing and producing regular tomato crops for two years and three months– this is a major success!
So after growing for over two years, what went wrong?
As I’d updated this post previously, I’d found that a cycle of pruning both the stems and the roots after harvesting each crop seemed to rejuvenate the plants. My plants were on the tail end of a huge crop, were overgrown, and many of the leaves were dying back, as had happened each and every time after a set of tomatoes ripened over the last 2 years and 3 months.
As I’ve done many times before, I cut back the stems and removed about half the roots, most of which were dead/dying anyway. I noticed within a few days that the few leaves I had left on the plant after pruning were dying. Again, not unusual as the plant recovers from being cut back severely.
What was unusual was that I didn’t see any new roots forming. Usually within a few days of pruning, tiny new white roots would be apparent.
I will say, I did cut a corner by not washing out the bowl that holds the water and nutrients. But I doubt that was the problem.
I think what was ultimately why the tomatoes died was that the main stems filled the growing pod completely, and they slowly strangled themselves to death. Similar to if you’ve ever had a tree that was dying, only to discover a forgotten piece of wire or rope still tied around the bottom of the trunk, constricting its growth.
You can see in this picture how the main stems filled the whole space, and a large portion appeared brown and dead. The brown “nubs” on the green stems are the beginnings of roots, and completely normal on any tomato. Stems that are brown inside are not normal– they’re dead.

So I took everything apart after declaring the tomatoes dead. It took a long soak in white vinegar to dissolve the mineral deposits that built up from the nutrient solution and our city water. This time I even used a dab of Lime Away on some of the worst spots.
I use filtered water, but over time I still see some build up. This is one big reason to change the water in the Aerogarden bowl periodically. It does reduce the amount of deposits. I had gotten lax in doing this the last few months and it showed.
I was a little disappointed that the tomatoes died, but two years is a long time to be growing the same tomato plants.
So I replanted the Aerogarden with one of their Salad Greens kits. I have tried growing a couple of different salad greens mixes using my regular garden seeds in my other Aerogarden unit over the last year. While they did grow, I wasn’t really happy with the results. They all bolted and formed seeds pretty quickly, and the leaves were all really soft rather than crisp– and just not all that great for salads. I struggled with growing tomatoes until I tried the seeds marketed by Aerogarden– so hopefully the same will hold true for their salad greens.
That said, I’m a scientist at heart, so we’re experimenting with some of my own flower seeds in my other Aerogarden. I’ve grown the flower garden sets sold by Aerogarden with much success. I wanted to see if we could grow any of what we already had at home, so we’re growing ‘Jolly Jester’ marigolds that my son saved seed from last summer, and a mix of miniature zinnias. The marigolds are probably way too big for the Aerogarden (they were at least 3 feet tall in the garden last year) and will require constant pruning, but my son is beyond excited that “his seeds” are actually growing. The zinnias are a mix of the cultivars ‘Thumbelina’, ‘Button-Box’, ‘Pumila’, and ‘Lilliput’ which can get to 24 inches tall. They may end up being too big too, but we’ll just experiment and see what happens.

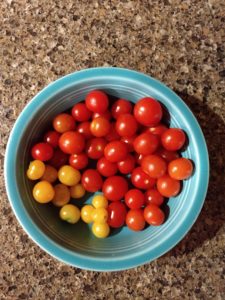
A typical harvest from our first wave of fruit set on our Aerogarden tomatoes. (The yellow-fruited plants produced less per plant compared to the red, and one of the yellow plants was stunted for some undetermined reason).
Are the tomatoes worth the cost of an Aerogarden?
If you’ve been curious about Aerogardens but hesitant to pull the trigger on buying one, the tomatoes alone make it totally worth the purchase price to me. This is definitely not a case of growing vegetables to save money– this is all about the experience. While all I’ve grown are cherry tomatoes (not “real” tomatoes by some people’s standards) they are pretty close in taste to what I harvest in my summer garden and they are a lot better than anything at the grocery store in January!! I’m looking at the Aerogarden as an opportunity to provide fresh produce year-round to my family and it’s also been a great project to do with my kiddos. Plus you just can’t beat harvesting fresh produce indoors while the winter rages outside. That’s a big win in my book.
You can certainly keep the Aerogarden producing tomatoes indoors through the summer months as well. But if you’d rather grow them outdoors and you’re short on space, check out my post on growing tomatoes in containers. There I share my favorite systems and tips for success.
If you liked this post, please subscribe to Grounded and Growing today and receive your copy of “15 Tips to Become a '15 Minute Gardener'” so you can spend less time working ON your garden and more time enjoying being IN your garden.! It’s absolutely free. When you join the Grounded and Growing community, you’ll finally take the garden off your “To-Do” list and allow yourself time to enjoy your garden and savor the peace and serenity there. I tell subscribers about new posts as soon as I hit ‘publish’ and send weekly-ish updates on what’s going on in my garden– good, bad AND ugly.

All Rights Reserved. © 2019 Jennifer Schultz Nelson.
Thank you for writing and sharing this! I am going to dust off the AeroGarden that’s been collecting dust in my garage and give it a go!
Sounds like a great plan Becky! If you have questions as you go feel free to email me at jen@groundedandgrowing.com!
Quick question – Did you use any kind of trellis system to support yours? The pics are small and I can’t tell. I am about 7 weeks in to my Aerogarden tomatoes and one is doing excellent; like 15 tomatoes already! Was wondering if any kind of trellis system was needed to support your lovely plants so mine can end up like yours. Thanks!
I do use the trellis that came with my Bounty model of Aerogarden. It is a rigid hoop of plastic that clips onto the post that holds the lights. It’s not all that great but it’s better than nothing. I have learned over time to not be afraid to prune the plants as they grow. It encourages them to branch and then they don’t need the support as much. I need to add some pictures of Aerogarden tomatoes that I’m growing outside this year just to see what would happen. They are crazy short and don’t need supports at all!
I started my first aero garden a few weeks ago. Have salad greens and cherry tomatoes. The lettuce has grown great. I just pollinated the tomato flowers a couple days ago and see tiny little green bumps growing. I am so excited! The greens taste great, can’t wait to have the tomatoes ripen!
Congratulations and welcome to the club! I have not had luck growing salad greens along with tomatoes. The tomatoes just crowd everything else out. What size aerogarden are you using? I am getting ready to plant my second unit (Aerogarden Harvest) with salad greens and am going to try putting a small fan on them. I grew some this summer in the same unit and the greens just weren’t crunchy. I’ve seen some folks in the FB Aerogarden group recommend using a fan to simulate wind– this should signal the plant to “toughen up” and those stronger leaves will have more of the “crunch” we associate with greens.