 Love homegrown tomatoes but no room for a garden? Learn the secrets to healthy and productive container-grown tomatoes in this week’s post.
This post contains affiliate links for your shopping convenience.
The first time I tried to grow tomatoes in a pot I killed them.
I was in graduate school, living in an apartment, and I missed homegrown tomatoes. I had read somewhere that you could grow a cherry tomato plant in a hanging basket. So I bought a hanging basket and a plant, threw it together one night and went back to working in my cornfield (I studied sweet corn in grad school). My tomato plant grew like crazy, flowered, and set a few fruit– I thought cherry tomatoes were in my near future. My mouth watered just thinking about it.
But then one day I came home to a wilted plant.
It got so that even if I watered the plant before I left each morning, it was still wilted when I got home. I gave up. But I learned the hard way that mature tomato plants need a lot of water, and a 12″ hanging basket is just not big enough to hold enough moisture to get through the day once the plant gets to a mature size.
I didn’t try to grow a tomato in a pot for a long time. It was at least five years before I tried it again using a commercially available self-watering planter. Over the years since I’ve tried a few different systems, some more expensive than others. But no matter what you use for growing tomatoes, success boils down to five basic areas:
Water
Water is the critical factor for success with tomatoes in containers. I can’t stress it enough. Tomatoes take up a lot of water each day. There is a guideline I’ve seen that says tomatoes need 1 to 1 1/2 inches of water a week to set fruit. This is for tomato plants in the ground. Tomatoes in containers are a completely different situation.
Unlike plants in the ground, containerized tomatoes are entirely dependent on the moisture available to them in their container; their roots cannot grow far and wide in search of moisture. You need enough soil volume to carry adequate moisture, or a way to supply additional water throughout the day, especially when temperatures climb. This is where the recommended 5 gallons of soil per tomato plant comes from. You could use less soil, but you’d be hard pressed to keep up with the watering without some sort of automated system.
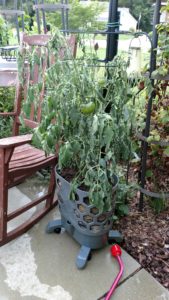
Using “Self-watering” containers generally lengthens the time you can go between waterings. They get their name from a reservoir and wicking system that keeps the potting mix moist. While these containers do give you a bigger window of opportunity to get your plants watered before they wilt, eventually you do need to remember to water. At my house these containers have been the difference between living and dead tomato plants. Even then I’ve had a few near misses (see picture below).

“Self-watering” containers only work when their reservoir is kept filled with water, as this wilting tomato plant proves.
Fluctuations in available water tend to encourage blossom end rot. This disorder is caused by a calcium deficiency due to dry soil. Calcium may not actually be in short supply, but it cannot move into the plant’s roots unless carried there by water. So no water= no calcium= blossom end rot. Some tomato cultivars are more susceptible to developing blossom end rot than others. It’s also worth noting that peppers and summer squash can also develop this problem when soil moisture fluctuates.

I harvested these tomatoes from the wilted plant in the previous picture. It only took a day or so of being wilted for the tomatoes to develop blossom end rot.
Soil & Fertilizer
Use a good quality soilless mix for container grown tomatoes. Even if you have the greatest garden soil, it will not drain well in a container. Plus you could bring pest and disease problems along with garden soil.
Most packaged soilless mixes (also called potting mix or container mix) have time-release fertilizer added to them. Even so, it’s a good idea to add some additional time-release fertilizer or plan on applying a good general purpose fertilizer after several weeks. The heat of summer and frequent watering that tomatoes need will deplete any fertilizers already incorporated in the mix sooner than what the package states.
It can help to add moisture crystals to your potting mix or look for a mix that already contains them. These crystals absorb water and slowly release it to your plants, helping keep their water supply constant. If you add your own crystals to your potting mix, be sure to follow the directions. Adding too many crystals will result in potting mix that stays too wet, which can promote root rot.
Cultivars
Determinate tomato varieties stay relatively short, making them easier to manage in a pot. All their fruit ripens at once. which can be a plus if you want to make sauce or salsa, but a pain if you just want to eat a few tomatoes here and there. Many tomato varieties marketed for patios and pots are determinate.
Keep in mind that many of the “patio” varieties have smaller fruits. Some of them are described as “cocktail” tomatoes, which are bigger than a cherry or grape tomato, but smaller than a typical slicing tomato. You can plant an indeterminate plant, which just keeps growing and setting fruit all season, in a container. But be prepared to offer extra support and yes, more water.
Pests & Disease
The good news about tomatoes in pots is you will use fresh potting mix each year, which limits how many pests and diseases you’ll encounter. Tomato roots grow so thick I don’t think you could save the soil mix even if you wanted to– you’ll be able to pull a thick brick of tomato roots and potting mix at the end of the season from whatever pot you use. It is possible for pests and diseases to move in from surrounding areas, so you really should remove the tomato plants from the area and not compost them.
Remember that pests can overwinter in nearby soil. The year I had problems with hornworms on my tomatoes, I had grown tomatoes in containers in the same location on my patio the previous year. The hornworm pupae had probably overwintered in the soil next to the patio and the adult moths emerged and laid hornworm eggs on my plants.

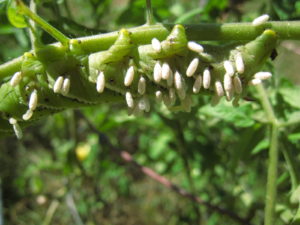
The easiest control measure for hornworms is to pick them off by hand. If you see any that look like this, leave them alone. This hornworm has been attacked by parasitic wasps and will die. The white, rice-like pupae will produce more wasps that will attack more hornworms. Photo: Lyle B. Clary.
Containers
The container you use for your tomato can be as simple or as fancy as your budget and taste allows. The recommended volume of soil for tomatoes is at least 5 gallons of soil. Potting mix is typically sold in 2 cubic foot bags, which is just shy of 15 gallons of soil. So you could plant 3 five gallon pots of tomatoes . I have used containers smaller than 5 gallons and failed miserably because I couldn’t keep up with the water needs of a full-grown tomato plant.
I was so disappointed in my first attempts at growing tomatoes in containers I didn’t try again for several years. Out of curiosity I tried the self-watering Earthbox® planter for tomatoes and other vegetables and was thrilled with the results. Even though I have an “in-ground” garden, I still plant an Earthbox® of tomatoes and one of peppers– as insurance in case I never get my main garden planted!
While I will always love the Earthbox®, last year I came across the Gardener’s Revolution Honeycomb Tomato Planter from Gardener’s Supply Company. It appeared different enough from the Earthbox® that I wanted to give it a try. I have never grown a more beautiful tomato plant as what I’ve grown in this planter. I think part of the secret is the felt-like grow bag and honeycomb openings on the rigid outer planter which allow for air pruning, which produces a highly branched, efficient root system. The rings that support the plant as it grows can be removed and wrapped around the plant, rather than hoping that you remember to guide the branches through before they get too big.

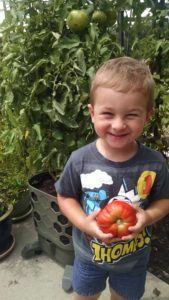
My son with our first tomato from the Gardener’s Revolution Honeycomb Tomato Planter. He loved that the plant was WAY bigger than him. We grew an indeterminate heirloom beefsteak tomato called ‘French’.
I ignored the instructions for the honeycomb planter where it said to use determinate tomato varieties which stay on the shorter side and planted a beefsteak indeterminate variety that I knew would be gigantic last year. I just wanted to see what would happen. It was huge– at least 7 feet tall! Then we had a storm blow through and the whole thing fell over. A couple of the support rings broke which Gardener’s Supply Company gladly replaced free of charge. I added a metal fencepost alongside my patio and used zip-ties to attach the planter, which kept it from falling over.
Just when I thought the Gardener’s Revolution planter was the greatest tomato planter ever, of course Gardener’s Supply came out with a new and improved Gardener’s Victory planter. It’s a lot bigger than the Gardener’s Revolution planter, but it seems less prone to tipping over, which is a great improvement.
I have also grown tomatoes in plain old 5-gallon buckets with success, and rigged up a few to be self-watering. I’m working with a friend on an improved version of this “DIY” self-watering planter to share with blog readers soon.
Another option if growing outdoors is not an option is the Aerogarden. It’s a hydroponic system (no soil, just water) that fits on a counter or table. I wrote about my experiences growing tomatoes in the Aerogarden and I hope it will inspire you to try it for yourself. It worked better than I ever imagined!
If you liked this post, please subscribe to Grounded and Growing today and receive your copy of “15 Tips to Become a '15 Minute Gardener'” so you can spend less time working ON your garden and more time enjoying being IN your garden.! It’s absolutely free. When you join the Grounded and Growing community, you’ll finally take the garden off your “To-Do” list and allow yourself time to enjoy your garden and savor the peace and serenity there. I tell subscribers about new posts as soon as I hit ‘publish’ and send weekly-ish updates on what’s going on in my garden– good, bad AND ugly.

All Rights Reserved. © 2017 Jennifer Schultz Nelson
Very informative letter, thank you for keeping it interesting!
Have you tried grow-bags with tomatoes? I wonder how well they would work.
I did try a grow-bag made of a tightly woven plastic, so there was some air getting to the mix from the sides but not much. Essentially it functioned like a pot, with all the associated issues with keeping it watered. The honeycomb planter I mentioned is basically a felt grow-bag inside a rigid frame so you get the benefit of root pruning with the porous grow-bag liner.