This post contains affiliate links for your convenience. I only recommend products that I have used or believe you will find helpful. 
Curious about composting? Did you know you can use a special kind of earthworm to create awesome compost from your kitchen scraps and junk mail right in your own kitchen or garage?
I had no idea worm composting (a.k.a. vermicomposting) was a thing until one winter night playing shuffle bowling in my friend Justine’s basement. (If you have no idea what shuffle bowling is click here— it’s super fun!) She’s a high school science teacher, and we were inseparable in college– “permanent lab partners” for every class in our Biology major. I think on this night I was still a frustrated postdoc researcher trying to figure out a path towards a “real job” that didn’t give me heartburn.
She gestured to a squat round black container with three legs in the corner and told me she was trying worm composting in her class. “You can actually hear the worms” I remember her telling me. After my initial “Eww” reaction, I had to have a look.
Inside that black container, which I later learned was the “Can-O-Worms” vermicomposting system, there were thousands of small reddish worms. And Justine was right– you could hear them! It was a pretty revolting “moist” sort of sound, but yes thousands of worms in one place do make noise.
Flash forward a few years, I had found a “real job” in Extension, and vermicomposting became one of my favorite topics to teach as an Extension educator. I even had a “Can O’ Worms” like Justine’s in my office. So many people had no idea that it contained worms! I loved the look on people’s faces when I told them (usually after they sat down in the chair next to it and put their coffee cup on top of it like it was an end table).

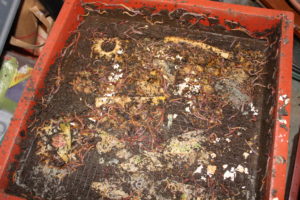
If you open the bin in my garage and look inside, thousands of worms are hard at work. Yes, you can hear them if you listen hard enough!
For years my vermicomposting pursuits stayed at my office. My husband was completely grossed out by the idea and was convinced it would smell bad. A friend gave me a different worm composter, “The Worm Factory”. So I set it up in our garage and didn’t say a word. My husband didn’t notice it was there for about six months! He was a little disappointed to admit that it didn’t smell at all.
I’ve messed with vermicomposting for years at this point– and thousands of worm lives were lost in the process! But I’ve also made some really amazing compost too. Here are my five essential steps to fabulous vermicompost:
1. Housing
Yes, there are dozens of DIY worm bin directions online. And they are less expensive than a commercial worm bin like my “Can O’ Worms” or “The Worm Factory”. I taught people how to make worm bins out of plastic storage totes for years myself!
But I never liked how the final product looked when we made our own bins. They were still just modified plastic storage totes. Although they were functional, they made some parts of vermicomposting, like controlling moisture, very difficult.
If you’re really unsure about whether worm composting will work in your family, by all means test it out with a DIY bin. But when you’re ready to handle most or all of your kitchen scraps, a larger commercial system is hands-down a better option in my opinion. Most of them can expand to handle quite a bit of compost, and it’s much easier to control moisture and harvest finished compost. It also doesn’t hurt that they pretty much look like a piece of furniture either.
2. Worms
The easiest way to start is to use Eisenia fetida, also known as red wigglers, compost or manure worms, for vermicomposting. While I’ve heard it’s possible to use other worms like Nightcrawlers, they require slightly different conditions that need a little more attention than red wigglers. So for me, the person that doesn’t have a lot of time to babysit worms, I would much rather use red wigglers that can survive without intervention for stretches of time.
If this comment crushes your dream of raising worms to compost AND go fishing with, fear not! You can use the red wigglers for fishing, though they are a bit small. And I’ve read that some people keep red wigglers and nightcrawlers in the same bin. While I wouldn’t recommend this setup for someone trying worm composting for the first time, once you get some experience under your belt you may want to give it a try.
I have had success starting my commercial bins with about 1,000 worms. If you do a DIY bin in a 9 gallon plastic tote I’ve used a little as 500 worms with success. Whatever number you start with will adapt to the size of your container and your feeding schedule.
Unless you know someone with an established worm bin willing to share, you will need to buy some worms. There are many options out there. I have tried a few different sources, and my favorite is Uncle Jim’s Worm Farm. They have a lot of helpful information on their website, and their customer service is top rate.
Very occasionally I have had luck buying fishing worms labelled “red wigglers”. But realize that some bait companies call immature night crawlers “red wigglers”. Before you go buying a bunch, call the bait company and find out the true identity of their “red wigglers” and save yourself some time and money.
If you’ve never ordered worms before, they come usually by mail in a cloth bag inside a box. I promise you’ll be horrified and strangely riveted to the writhing ball of worms inside.
3. Bedding
Worms need some form of “dry carbon” to balance out the wet food scraps we’re going to feed them. If you’ve ever had a traditional compost pile in your garden, you may have read about adding a mix of green (wet) landscape waste and brown (dry) landscape waste. The dry bedding is essentially the brown layer in worm composting. The dry bedding also helps to keep moisture levels in a healthy range.
I use a mix of shredded office paper, newspaper, paper cartons (like egg cartons or fast food drink holders), cardboard and coconut fiber (coir) for my worm bedding. Like so many gardening topics, there are people that insist there is only ONE way to vermicompost (usually their way).
Some people swear by ONLY using newspaper, some ONLY use shredded office paper, some NEVER use paper with colored ink.
I’ve researched this over the years, and from what I’ve read, the days of colored ink containing heavy metals or other nasty chemicals is long gone. At least 20 years long gone. And while there may be a few petroleum based inks still lingering out there, most everyone uses soybean oil based inks.
One site I read made a very good point about potentially using petroleum based inks in compost. Soil microorganisms can break down petroleum. Researchers are using soil microorganisms to clean up oil spills– they can handle a few drops of ink on paper in our compost.
Well what about slick shiny paper? That has to be bad, right? My best answer is maybe, but not because it’s a health hazard. It just might not compost, or might compost very slowly.
Many slick papers, like colored sale papers, are coated with a thin layer of clay– no big deal for the compost bin. Except sometimes I’ve noticed the colored papers matting together more than plain black and white. Maybe the slick coating gets sticky– I’m not really sure. I still use the slick sales papers, I just use them mixed in with other paper and tear them up if possible.
Some slick papers are actually coated with plastic– this will not break down in your lifetime! All I can say here is to get to know what potential bedding you tend to have and learn what works and what doesn’t. I know that certain cardboard cartons– usually ones designed to stand up to moisture– tend to have plastic coatings. You can still use them in your compost if you don’t mind fishing the thin layer of plastic out of the compost at some point. The plastic can trap moisture and interfere with the composting process.
Also keep in mind that some envelopes have plastic windows that don’t compost. If you shred these envelopes and use the shreds in your worm bin you will be fishing out pieces of plastic forevermore from your compost and garden. I learned that the hard way.
One drawback to using only paper for worm bedding is it can compact and become a slimy stinky mess. Once it gets compacted, air doesn’t circulate and bacteria that exist in oxygen-poor environments take over. Think sewer smell.
If you can remember to stir and fluff your worm compost from time to time that helps. But sometimes the layered-style commercial worm bins just get heavy over time as the compost forms. Using more corrugated cardboard can help keep air circulating. I have had great luck using coconut fiber, sold as “coir” to keep the compost open and fluffy. I layer it in with food scraps when I feed the worms. I don’t measure, but just eyeballing it I’d say it’s about half the amount of food scraps I’m adding.
The drawback is you do need to buy it, but it comes in a compressed brick that takes up little space and lasts quite awhile. I really prefer the finished vermicompost with coir mixed in. It’s lighter and fluffier and more soil-like.
4. Food & Moisture
In theory, composting worms can eat half their weight in food every day. This does vary some with temperature and type of food scraps. But keep this ratio in mind when feeding your worms. Many problems in vermicomposting trace back to how much you’re feeding the worms.
In general, any non-processed, non-meat kitchen scrap is fair game for vermicomposting. So pretty much any fruit or vegetable is fair game (with a few exceptions). If the scraps are a bit “ripe” (think liquid cucumbers) that’s even better . What I didn’t realize when I first got into vermicomposting is the worms aren’t eating the food scraps– they’re eating the portion of the food scraps that are decaying. Yum!
One exception to the fruit and vegetable rule is adding egg shells. Egg shells are great for the worm bin– worms need the grit they provide in their gizzards, an internal organ that helps them grind up their food. Crush them up before adding them. I’ve known some people that even crush them extra fine in a blender– the food scraps too. I’ve never personally had the time or energy to do this, but if you feel compelled to pamper your worms, there are others out there that share your passion!
There are a few food scraps that you should feed in moderation– anything acidic, especially citrus, coffee grounds and tea bags, can kill the worms if fed in high enough amounts. My first batch of worms in my office worm bin died rather suddenly. I had told my co-workers that the worms could have coffee grounds. My autopsy of the dead worm bin revealed a boatload of coffee grounds in the bin. My conclusion was that the amount of coffee grounds our office of caffeine addicts generated completely snuffed out the worm bin population.
One thing I avoid putting in my worm bin is avocado pits. At my house they just don’t seem to break down. But they did sprout. So if you’ve wanted to sprout your own avocado tree…..
Feeding your worms is directly related to the moisture level. Moisture is critical to worm composting. There is a pretty broad range of moisture levels that produce happy worms. But either extreme will destroy your vermicomposting efforts.
Too little moisture: usually from too little food, and plain ol’ neglect. If the worm bin gets too dry, the worms will die. Vermicomposting is in general a pretty forgiving system that can go without attention for quite awhile, but everything has it’s limits. Fortunately, if this happens to you, you may be able to revive the bin by adding moisture. Red wigglers reproduce with yellowish lemon-shaped cocoons that can survive extended dry periods and the baby worms will hatch once moisture returns.
Too much moisture: usually from too much food, too little bedding, or a combination of the two. Too much food and moisture is usually an invitation for a fruit fly infestation. I usually add about a section’s worth of newspaper over the top (not shredded, just use the whole thing) when feeding my worms as extra insurance to keep fruit flies out.
Excess moisture will also interfere with air circulation. Once the bedding’s oxygen is depleted, anaerobic microbes take over and the smell of your worm bin will knock you over when you open it.
One of the first things worms will do when the bedding is too wet is to crawl out of the bin. Although they can also crawl out if the bedding is too dry, in my experience I’ve had them crawl out far more often in a too wet situation.
Regulating moisture is one of the big reasons I prefer commercial worm bins to the DIY ones I used to teach people how to make out of plastic totes. Every commercial bin I’ve come across has some sort of spigot at the bottom.
I’ve known some people that keep the spigot closed but check it regularly and drain off the liquid. I am not a person that will remember to do this. So I prefer to keep the spigot open with a small bucket underneath to catch the liquid that drains from the bin.
This liquid collected during composting is awesome for watering plants.
5. Harvesting Compost
Ease of harvesting is the other big reason I prefer commercial worm bins to the DIY version. Most every commercial bin uses some sort of layer system. If you stop adding new food to a particular layer, the worms will naturally move to other levels once they consume the food where they are.

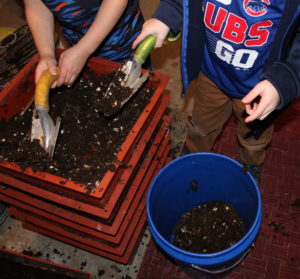
My son and his friend harvested a finished layer of compost recently. It’s still too cold here to garden, so we put it in a bucket to use this spring. The white specks are egg shells. They are great for our garden soil!
At that point, you could remove the layer and use the compost. There should be few, if any worms present. If you’re still worried about losing too many worms, use the fact that red wigglers hate light to help you sort out compost from worms. Shining a flashlight and even just bringing the layer out into the light of the room will drive any worms to the bottom. Scoop compost from the top and safely leave any worms present behind.
If you are harvesting from a DIY bin, use the same light shining procedure but it is much harder since there are a lot more worms present. Some people dump their compost out on a tarp to help with harvest. I’ve never done this whole tarp procedure, and just the though of it makes me tired. Did I ever mention how I prefer commercial worm bins?
I can’t say enough good things about using the end product in our gardens. It’s really fabulous compost. But I think what I love about it even more than other forms of composting is how easy it is. I literally step into my garage and there’s my worm bin. I don’t even have to put shoes on. And no turning or extensive shoveling required.
Vermicomposting is also awesome because you can create compost year-round. Part of my motivation for setting the bin up in our garage was our other compost bins always got overloaded and frozen halfway through the winter. The bin in my garage has been chugging along all winter, even during the Polar Vortex.
Other Helpful Resources
“The Bible” of Vermicomposting
Worms Eat My Garbage by Mary Appelhof.
All worm bins will eventually have other creepy crawly inhabitants along with the worms. Some are indicators of a healthy bin, some indicate a problem. This website has a great chart of pictures and information to keep tabs on any visitors that appear.
If you don’t have space for a traditional compost bin outdoors, or are looking for an easy way to compost all year, I hope you’ll consider vermicomposting. It’s also a great garden activity to involve your kids in as well!
If you liked this post, please subscribe to Grounded and Growing today and receive your copy of “15 Tips to Become a '15 Minute Gardener'” so you can spend less time working ON your garden and more time enjoying being IN your garden.! It’s absolutely free. When you join the Grounded and Growing community, you’ll finally take the garden off your “To-Do” list and allow yourself time to enjoy your garden and savor the peace and serenity there. I tell subscribers about new posts as soon as I hit ‘publish’ and send weekly-ish updates on what’s going on in my garden– good, bad AND ugly.

All Rights Reserved. © 2019 Jennifer Schultz Nelson.
Thank you Jen. Vermiculite is brand new to me. I want to try all these new ideas before I’m too old, so I have to hurry. 😄