Follow these pruning tips to tackle your pruning projects, big or small.
This post contains affiliate links.
The beautiful sun has returned this week, making me dream of warm spring days. I’m starting to get the “itch” that gardeners come down with this time of year– you want to do something in the garden, but it’s just not time yet.
Whether or not you’re feeling particularly “itchy”, it’s the perfect time of year to prune some kinds of trees and shrubs. If you, like me, sometimes have to talk yourself into certain tasks, pruning now will mean less work later. Repeat as often as necessary.
Pruning scares a lot of homeowners. But like so many things in life, breaking the job down into manageable steps will take away much of the intimidation and fear, and reduces the need for major pruning projects in years to come.
Assessment
- Make a habit of regularly walking around your property to look at your landscape. While you can spot lots of different problems this way while they’re still small, a mild winter day is an excellent time to study branch structure and make a note of what needs pruning. Plus most pruning is best done in winter when trees and shrubs are dormant.
- Before making the first cut, spend time studying the tree or shrub in question, either in person or a picture. One tip I found helpful said to take a picture and use photo editing tools on your computer or phone to reverse it horizontally. Looking at the mirror image can sometimes help highlight the areas that need improvement. You could even take it a step further and erase the branches on the picture and see if you like the result.
- When you are amid pruning, step back now and then and assess your progress. It’s far too easy to get absorbed in the task and get a little carried away. Once you remove a branch, you can’t put it back!
- Keep in mind that if you prune spring flowering trees and shrubs now, you will remove many of the flower buds. This is one group of plants that most sources suggest pruning immediately after flowering since they spend the rest of the summer and fall developing their flower buds for the following spring.
- Even though they flower in the spring, late winter is a great time to prune fruit trees. Pruning fruit trees is an art unto itself. Your local Extension office can offer a lot of advice on pruning fruit trees. North Carolina State Extension has a great publication on fruit tree pruning available online here. I also like this more general publication from Purdue University Extension— it’s great if you like lots of diagrams!
Tools
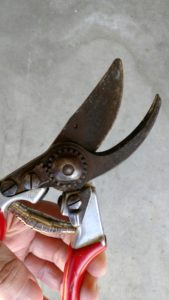
- Invest in quality pruning tools. They don’t need to be super-expensive but look for brands that have replacement parts available. Good quality tools will hold up to all sorts of abuses, even at the hands of a well-meaning husband. Mine put my “dirty” pruners through the dishwasher! They came out completely rusty, but a Blades that are easy to sharpen are a plus. Some brands even come in different sizes or have adaptations for arthritis or grip strength issues. I’m left-handed, and I was ecstatic when I found a brand that makes a left-handed pruner. It may not sound like much, but the comfort of the pruner in your hand may be the deciding factor as to whether you actually use it.

My trusty left-handed bypass pruners
Use the right tool for the pruning job at hand.
- Bypass-type pruners, which resemble scissors, are the preferred tool for pruning living plant material because as the blades cut they pass by each other and cut cleanly (hence the name “bypass” pruner).
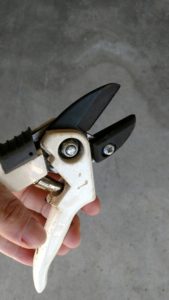
- The other standard style of pruner is anvil-type. They have one sharp blade that comes down onto an opposing hard surface. The anvil-type pruners tend to crush the ends of branches, which can damage living branches. But they are perfectly fine for cutting up dead branches and general brush cleanup.

Anvil-type pruners
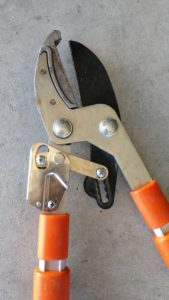
- An exception to the bypass vs. anvil-type pruner rule may be a ratcheting anvil-type pruner. This style of pruner has a mechanism that allows the pruners to close a small amount at a time. You make a quick adjustment in the handle which allows it to close a little more, almost in a step-wise fashion, and eventually, it’s completely closed. I have a couple of ratcheting anvil-type pruners, and I’ve noticed that as long as they are sharp, the ratcheting mechanism allows for cutting a branch without crushing it.

Ratcheting lopping shears– great for branches too big for hand pruners
- Match the right tool to the right job. Most hand pruners can only handle branches up to about 1 ½” in diameter. Trying to use a hand pruner on a too-large branch will likely damage one of more of the following: the branch, the pruner, or your hand and wrist. Use lopping shears or pruning saws on larger branches.
Making the Cut
- Remove no more than 1/4 to 1/3 of branches at one time. Removing more will likely be an enormous stress on the plant, and it will not begin to regrow until it recovers, leaving you with an ugly tree or shrub in the meantime.
- A notable exception to this rule of thumb is rejuvenation pruning. Some shrubs can tolerate being cut back nearly to the ground periodically in late winter or early spring. Not every shrub can handle this, but for those that can, it is a good way to breathe life back into overgrown shrubs that appear nearly dead in the center. Examples of shrubs that thrive with rejuvenation pruning every few years are spirea and red twig dogwood.
- Renewal pruning of shrubs is selectively removing about 1/3 of the oldest, thickest branches to invigorate the overall appearance of the plant. It also often improves flowering, by promoting the growth of vigorous new branches. Examples of shrubs that thrive with renewal pruning are lilac and forsythia.
- Not sure where to start pruning? Start with removing crossing branches, as they may rub together and damage each other, remove any vertical twigs known as “water sprouts” as these tend to be weak, and remove whole branches whenever possible. If removing a whole branch is not possible, remove the branch up to a sturdy secondary branch.
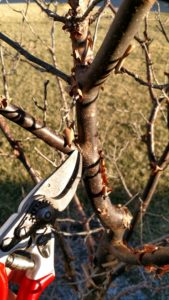
- When removing entire branches, look at where the branch joins a larger branch or the trunk of the tree or shrub. There is a ridge of tissue that looks like a turtleneck—this is the branch collar. The collar produces plant hormones that promote natural healing at the cut site.

The tip of my pruners are pointing at the branch collar on my paperbark maple tree (Acer griseum).
- When pruning at the branch collar, cut at an angle that will allow water to drain away from the wound site, so that it does not pool in the cut and promote disease. Use of “pruning sealer” or other such products is unnecessary and not recommended. The tree or shrub’s natural healing ability is best.
- Leaving a large “stub” of the branch extending beyond the collar will not promote healing, and will be unsightly. Cutting the branch off flush with the trunk or larger branch will remove the collar and its healing hormones. A flush cut takes much longer to heal and is more susceptible to insects and disease.
- Removing branches with potential to fall on buildings or across power lines is clearly a good idea, but keep in mind that in most cases large limb removal is best left to the professionals.
If you’ve never done much pruning before, don’t expect to correct all pruning-related problems this year. It will likely take two to three years, maybe more, to fix severe problems. But rest assured it is one of those tasks that if you make a habit of doing a little each year, it should eliminate the need for future intensive pruning interventions.
If you liked this post, please subscribe to Grounded and Growing today and receive your copy of “15 Tips to Become a '15 Minute Gardener'” so you can spend less time working ON your garden and more time enjoying being IN your garden.! It’s absolutely free. When you join the Grounded and Growing community, you’ll finally take the garden off your “To-Do” list and allow yourself time to enjoy your garden and savor the peace and serenity there. I tell subscribers about new posts as soon as I hit ‘publish’ and send weekly-ish updates on what’s going on in my garden– good, bad AND ugly.
Leave a Reply