 So you’ve kept your orchid alive for awhile, and the flowers are gone– How do you convince it to re-bloom?
This post contains affiliate links for your shopping convenience.
The first time an orchid re-bloomed under my care, I was pretty impressed with myself.
This proved I really knew something about orchids, right?
Flash forward a couple of years and I lost my whole orchid collection to a mealybug infestation. I guess I really didn’t know as much as I thought I did. Like I mentioned in my last post, I had no idea mealybugs could infest an orchid’s roots and kill the plant without being seen.
People that know I love orchids eventually ask me what the secret is to coaxing them into re-blooming. I don’t know that anything I do is a “secret”; I like to think that we can try to set our plants up for success, but then Mother Nature takes over.
Build a healthy plant and blooms will come
- I mentioned it in my first orchid post, but my favorite orchids are Phalaenopsis. They are readily available and grow well in home environments without a lot of extra fussing and will re-bloom without a lot of special intervention. There are orchids that need a lot more coddling than Phalaenopsis. I don’t grow them.
- Most Phalaenopsis naturally bloom once per year, and the flowers last for months. When the last flowers fade, you may be able to coax the plant into producing more blooms by cutting the stem beneath where the first bloom was attached. If you’re lucky, an additional flower spike will emerge from triangular bumps of tissue known as “nodes” located further down the stem. Do this only on healthy plants, since it takes a lot of additional energy for the plant to produce a second set of blooms in one year.
- Keep your plant healthy and provide adequate light, water and fertilizer. See my last post for more information. Consistently providing enough of all three will go a long way to growing a healthy plant that will re-bloom. I mentioned how well the product Orchid Myst worked for my orchids for pest control. I also had all eight of my orchid plants in bloom last winter– and several plants had multiple and/or branched flower spikes. I’d never had that sort of spectacular flowering, even when I had a big grow light setup. My results are completely anecdotal with no trace of scientific study attached, but I really do think the Orchid Myst is creating these amazing results.
- Cool nights may promote re-blooming. Some sources say the key is having a 10-15 degree difference between day and night temperatures, some say it is a night temperature between 55-65°F. Either way, you may find it easier to produce these conditions by moving your Phalaenopsis outside for the warmer months. Orchids need some shade outside– full sun will burn their leaves. My plants flourish on a north facing, shaded porch, which is still brighter than any spot indoors over the winter. One orchid I had years ago did absolutely nothing sitting on a shelf indoors for a couple of years, but produced a flower spike within a month of going outside for the summer.
How do you know your orchid is going to rebloom?
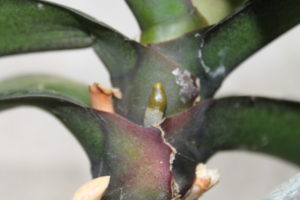
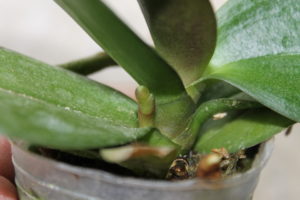
- Look for flower spikes to emerge near the base of Phalaenopsis, typically between the leaves. It can be tricky to tell a new root from a flower spike. Roots are generally fatter with a green tip and whitish coating, and flower spikes are thinner, all green or green/purple and have a “mitten” appearance when first starting to grow. Over time the roots will grow downward, and the spike will grow upwards.

New orchid root

New orchid flower spike. Do you see the “mitten” shape?
- If you bought your Phalaenopsis in bloom, the flower spike was likely clipped to a stake in the pot and held nearly straight up (so more orchids could be packed in their shipping crates destined for retail stores). As your orchid comes into bloom again you’ll notice the flower spike doesn’t naturally grow completely vertical. It grows out somewhat at an angle, almost horizontal and will start to hang down as flower buds swell and grow heavy. This can take up too much space or be unstable, so staking it can help.
- Once the flower spike is about 12 inches tall, insert a bamboo stake near the base of the plant near the flower spike. Be gentle when inserting the stake so as not to damage the roots. Secure the flower spike to the stake at the first node, or bump on the spike. Use a spring loaded clip for orchids, soft twist-tie or Velcro tie— nothing sharp. Continue adding clips every few inches, up to the first flower bud. Allow the rest of the flower spike to form a natural arch after the last clip.
- Keep in mind that flower spikes follow the strongest light source. Once flower buds appear, it’s important to not change the direction of the light for your orchid. Otherwise the flower spike follows the light and all the flower buds twist around and look distorted once they do open. I made this mistake last winter with one plant and while the rest of my plants had blooms seeming to gracefully float in the air, the plant I turned while the flower spike was still growing had flowers growing out at crazy angles and it just looked wrong. All that waiting for it to bloom and I messed it up by fussing with it.
- If you bought an out-of-bloom orchid on clearance this year, you are probably wondering what color its blooms will be. You can make a general guess as to color by the plant’s appearance. Plants that are bright green all over are usually white, yellow or “sunset” coral colors. Plants that have darker, purplish leaf edges or bases will likely have a lot of purple pigment in their blooms.
When you don’t want your orchid to bloom— Wait a minute– WHAT!?
- If your orchid plant isn’t healthy, don’t let it bloom. When you see a flower spike, cut it off. You heard me correctly.
- My friend gave me a very neglected orchid a couple of years ago, hoping I could save it before she neglected it to death. It barely had two leaves and one decent looking root. I gave it some TLC, and saw a new leaf emerge. But then a flower spike showed up. This plant was way too fragile with only three leaves and one root to expend energy growing flowers. Sometimes stressed plants produce flowers in a last ditch effort to reproduce– as in, I’m dying, so time to produce seeds for the next generation.
- I snipped off that flower spike and continued fertilizing and spraying the plant with Orchid Myst along with the rest of my orchids. It grew into a healthy looking plant and when the flower spike appeared that second year, I let it grow and had a glorious crop of deep purple blooms.

Success! These gorgeous purple blooms came from a neglected plant that I removed the flower spike from the year before.
When you’re an orchid hoarder at heart
These sorts of success stories fuel my orchid obsession. I want to save every orchid I see on a clearance table.
As much as I’d love to grow every gorgeous (and not-so-gorgeous) orchid I come across, these days I limit my collection to what can fit in my bathroom window, which seems to have the perfect light and humidity for Phalaenopsis.
It’s hard to admit, but the scramble to care for my army of orchids years ago sucked much of the joy out of growing them. There were plenty of times I was so busy I was meeting myself coming and going and I didn’t give them the minimum level of care. Looking back I’m sure that’s one big reason I missed the start of the Mealybug Massacre that wiped out my collection.
This time around, setting a limit for my collection based on available space is working really well for me. So far I haven’t found myself trying to skirt around it (much), which surprises me. I’m actually enjoying my new smaller collection more than when I had a spare bedroom dedicated to orchids. I’m able to just enjoy caring for them without rushing on to the next thing– a great antidote to modern life which seems to move faster and faster each day.
If you’ve been frustrated and anxious waiting for your orchid to rebloom, hopefully this post gave you at least one new strategy to set your plants up for successful blooming. But hopefully you can find some Zen in caring for your orchids– blooming or not– and the blooms are just a beautiful bonus.
If you liked this post, please subscribe to Grounded and Growing today and receive your copy of “15 Tips to Become a '15 Minute Gardener'” so you can spend less time working ON your garden and more time enjoying being IN your garden.! It’s absolutely free. When you join the Grounded and Growing community, you’ll finally take the garden off your “To-Do” list and allow yourself time to enjoy your garden and savor the peace and serenity there. I tell subscribers about new posts as soon as I hit ‘publish’ and send weekly-ish updates on what’s going on in my garden– good, bad AND ugly.

All Rights Reserved. © 2017 Jennifer Schultz Nelson
Good day I have one orchard the moth orchard (phalaenopis I think ) fits the photo you have It bloomed beautifully from august to October I have looked after it the stems on which the flowers were are growing What concerns me is the pot it is in seems to be small I got it as a gift through the net florist centre do I need to transplant it into a bigger pot if so how much bigger Really appreciate your help as I do not to damage it
Hello! If whatever your orchid is potted in is starting to break down and look like soil, it’s time to repot. Many epiphytic orchids, including Phalaenopsis, like to be a little crowded in their pot. But as that bark or peat moss based potting material starts to break down, it holds too much water– and that is a recipe for root rot, and ultimately the death of your precious orchid! When you repot, choose a pot only an inch or two larger than the current pot. This is because if you have too much potting mix without roots growing through it, you end up with too much moisture, setting the stage for root rot. Also, I love clear plastic pots for Phalaenopsis, as it makes it easy to look at the roots and see that all is well (or not).